Logical Volume Manager (LVM) | Resize Volume on the go
How to Resize Volume without restarting the process or without removing the volume
LOGICAL VOLUME MANAGER : LVM is a tool to easily expand or combine multiple hard drives into a single pool of storage and makes it easy to dynamically resize and create new partitions. LVM has the ability to take a snapshot of your logical volumes without un-mounting the disk.
In other words, you can connect multiple physical hard disk drives to your machine and make OS to treat all of them as single partition.
Video Tutorial:
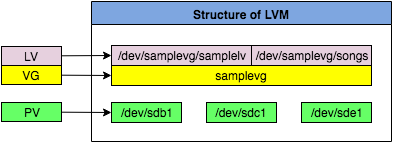
Components of LVM :
- Physical Volume (PV): Several disk partitions under physical volume that builds up to volume group.
- Physical Extent (PE): It is the smallest amount of the disk allotted to logical volume for further addition of multiples of physical extent.
- Volume Group (VG): Volume group are similar to an actual disk drive with multiple partitions.
- Logical Volume (LV): Logical volume made from Volume group similar to partition on disk drive
Installationsudo yum install lvm2How To create a LVM :
1. Make a new partition and set the type of the partition as LVM. Suppose, you have a partition as '/dev/xvdb1', then run the command fdisk/dev/xvdb1.
2. It will open a new window fdisk prompt.
3. Press 'p' for partition and 'n' for new on the new disk for the first partition then accept all the default settings until you get the command 'm' for help.
4. We need to set it as LVM. To do this, give the command 't', followed by '8e'
5. Now press 'w' to save all the changes made to the disk.
Create physical volume (PV)
pvcreate /dev/xvdb1
output:
Physical volume "/dev/sdb1" successfully created
pvdisplay output would be like:
--- NEW Physical volume ---
PV Name /dev/sdb1
VG Name
Allocatable NO
PV Size 100.00 GiB
PE Size 0
Total PE 0
Allocated PE 0
Free PE 0PV UUID some-random-id-here
Create Volume group (VG)
vgcreate samplevg /dev/sdb1
output:
Volume group "samplevg" successfully created
vgdisplay output would be like :--- Volume group ---
VG Name samplevg
System ID
Format lvm2
Metadata Areas 1
Metadata Sequence No 1
VG Access read/write
VG Status resizable
MAX LV 0
Cur LV 0
Open LV 0
Max PV 0
Cur PV 1
Act PV 1
VG Size 15.00 GiB
Total PE 3839
Alloc PE / Size 0 / 0
Free PE / Size 3839 / 15.00 GiB
VG UUID some-random-lengthy-IdCreate a Logical Volume (LV)
lvcreate --name samplelv --size 3G samplevg
Output:Logical volume "samplelv" created
Run lvdisplay to see the logical volume created
--- Logical volume ---

LV Path /dev/samplevg/samplelv
LV Name samplelv

LV UUID yet-another-random-unique-id
VG Name samplevg

LV Write Access read/write

LV Creation host, time localhost, 2016-10-22 18:34:57 +0000
LV Status available
LV Size 3.00 GiB

Allocation inherit
Current LE 1280
Segments 1
Read ahead sectors auto

- currently set to 8192

Block device 253:1
Creating a file system on the logical volume group that we’ve just created. Choosing ext4 here.
mkfs.ext4 /dev/samplevg/samplelv
We can mount it and use it now.
We can mount it and use it now.
mount /dev/samplevg/samplelv /mnt/
Extending LVM or add disk to LVM Partition
Repeat steps from 1 to 5 and pvcreate from “How to create a LVM?”, replacing sdb with sdc.
Now, we got the disk added in the PV. Now let us extend the volume group.Extending Volume Group with new partition
vgextend samplevg /dev/sdc1
Extending our logical volume with new partition
lvextend /dev/samplevg/samplelv /dev/sdc1
You’ll get an output like: Size of logical volume samplevg/samplelv changed from 3.00 GiB to 10.00 GiB
Tell our Volume to have fun with extra size
resize2fs /dev/mapper/samplevg-samplelv
